
Introduction to OpenShift
OpenShift is a Platform-as-a-Service offering provided by Red Hat. It's built on top of Linux containers (which they refer to as 'gears') hosted in Amazon's Amazon Web Services (AWS). They offer many different platforms such as PHP/Apache, JBoss, Tomcat, NodeJS, Python, Ruby-on-Rails, and many more. OpenShift refers to these pre-built platforms as 'cartridges.'
Beyond the platforms they offer, OpenShift also takes care of DNS (you are given a *.rhcloud.com subdomain), load balancing via HAProxy, and auto-scaling for your application. Much like Heroku, code deployment is as easy as executing a git push. All of these features, including 3 containers, are all free of charge.
Red Hat has done a good job making OpenShift "cloudy" - for example, database connection strings are handled by environment variables. This is cloud-friendly because:
- Your source code can now reference the environment variables instead of storing credentials in your source (preventing you from using public repositories) or having a separate private deployment repository with credentials that you have to manage.
- Your source code can now be deployed instantly in another OpenShift environment, no need to change credentials in the code.
- You don't have to worry about passing credentials to new instances during auto-scaling, OpenShift takes care of it for you.
- Your application and operations folks can deploy and manage your application without them having access to the database credentials.
This is just one example but I think it does a good job illustrating the foresight Red Hat had when they built OpenShift.
If you're a developer and don't want to worry about the infrastructure details yet, OpenShift is really an amazing service. You can set up an application in just a few minutes, I'll show you how. Let's get started.
Initial Setup
- Sign up for an account at http://www.openshift.com and verify your account once you receive the confirmation email.
- When you verify your email, you'll get redirected to a welcome page that invites you to "Create your first application now." Go ahead and click on it.
- Find the type of application you want to deploy, either by browsing the available cartridges or searching. Keep in mind, you can add additional cartridges (like Jenkins or MySQL) later, so don't freak out if you can't find an entire LAMP stack or something. For this example, I'll choose the Python 3.3 cartridge.
- On the application configuration page, you'll be prompted to provide an application name (which will be pre-populated with the cartridge name) and a namespace name. Heads up - the namespace you set now will be used for ALL future applications as well. Think of it like a subdomain - use something appropriate like your user name or your organization's name. Fear not, you can create custom DNS CNAME records later if you need a sexier URL.
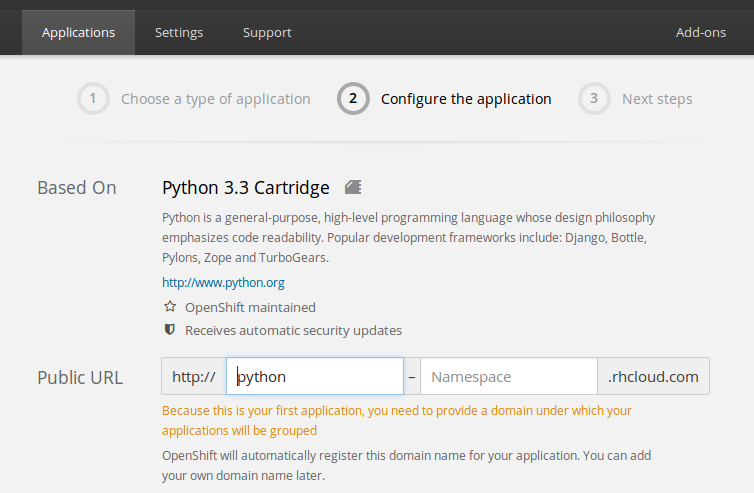
- If you already have code that you want to deploy in a git repository, you can provide a git URL and Openshift will automatically clone a copy and deploy it to your container. Note - if your code relies on OpenShift environment variables for a database connection string, don't use this feature. Wait until after you add all cartridges before deploying your code, otherwise those environment variables won't be set. If you're using a free account, you will only be able use the 'small' sized gears, but you can take advantage of auto-scaling. Finally, choose which AWS region you want to deploy to and click "Create application."
- There are a number of configuration options presented in the application summary page:
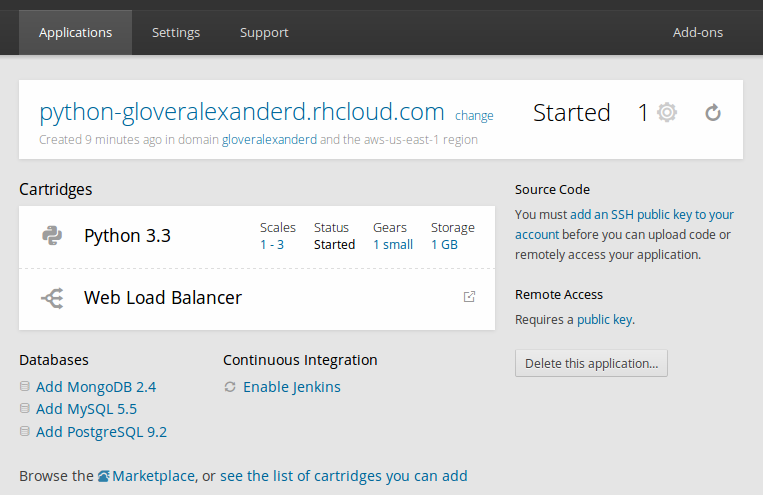
- You can set the minimum and maximum number of containers as well as container size in your auto-scaling group by clicking the "1-3" under the "Scales" column header. Clicking on the gear size will take you to the same page.
- If you upgraded beyond the free account, you can set how much local storage is presented to your container by clicking on the "1 GB" under the "Storage" column header.
- To see HAProxy load balancer statistics, click the arrow icon on the Web Load Balancer row.

- You can add additional cartridges by clicking on the "Add X" links at the bottom of the page. These cartridges will be bound to your application and restarted in conjunction with your application. If you add a database cartridge, connection string variables will be set as environment variables for your application to leverage. Here's a list of relevant OpenShift environment variables.
- You can add DNS names by clicking "change" next to your *.rhcloud.com DNS name.

That's it for deployment. At this point you'll want to install the OpenShift CLI tools to deploy new code, check application logs, and manage application components.
Deployment Overview
Once you have the OpenShift CLI tools installed and configured, deploying code is extremely easy. To start, clone the git repository to your local filesystem. You can find the git URL in your application configuration screen labelled "Source Code":
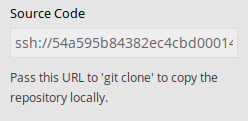 Clone the repository:
git clone ssh://<random_hash>@appname-namespace.rhcloud.com/~/git/appname.git/
Change to your newly created app directory:
cd appname/
Add your files, make changes, hack away to your heart's content in this directory. Once you're ready to re-deploy, add the files to the git index, make a commit, and push the latest source:
git add .
git commit -m 'this is my commit message'
git push
When you push new code, all application cartridges will be restarted and your new application should be available in a few seconds. If you need to add additional startup commands for your application, you can add additional action hooks.
That's it - you should now be able to create and deploy an application with OpenShift with ease.
Are you using OpenShift, or some other PAAS offering? What are your thoughts?
Leave a Comment