
Raspberry Pi Project 1: NAS and XBMC
The Raspberry Pi makes a great HTPC or media PC, whatever you want to call it, because of its low cost, low power consumption, quiet, and small form factor. As I was getting ready to start my Raspberry Pi build, I realized that the Pi could take over a few other functions that my desktop does, including NAS, at a fraction of the cost (see my previous post about Powering a Pi and related utility savings). But could I modify a RaspXBMC build to also run Samba or some other network file sharing? Could XBMC be installed on Raspbian with less than a thousand calls to aptitude? Could XBMC and Samba run simultaneously on a Pi without making video playback unwatchable? That's what I hoped to find out.
For context, I started with a Raspberry Pi starter kit from Amazon. For storage, I am using a Fantom 2TB external hard drive. After some preliminary research, I decided to start with Raspbian and try to install XBMC on top. For this walk-through, I'll assume you've got your Raspberry Pi powered, connected to your router, and that you have gotten Raspbian installed. If you need help getting started, check out the Raspberry Pi Quick Start Guide.
Part 1 - NAS
Part 1.1 - NTFS-3G
If you don't plan to use NTFS as your filesystem for your Pi storage, you can skip this step!
If you do want to use NTFS, and you want to be able to read AND write to the drive, you need to install NTFS support:
sudo apt-get install ntfs-3g
If you're starting with a brand new external hard drive, you'll need to create the partition and filesystem.
pi@raspberrypi ~ $ sudo fdisk /dev/sda

Command (m for help): n
Partition type:
   p   primary (1 primary, 0 extended, 3 free)
   e   extended
Select (default p): p
Partition number (1-4, default 2): 1
Command (m for help): t
Selected partition 1
Hex code (type L to list codes):7
Command (m for help): w
...
(disk is formatted)
...
pi@raspberrypi ~ $ mkfs.ntfs /dev/sda1
Part 1.2 - Automounting with fstab
In Raspbian (and every flavor of Linux I've worked with so far), all filesystems that should be mounted at boot are identified in the fstab file (/etc/fstab). The fstab file can be configured a million ways, so I'll just share my configuration and explain.
proc            /proc           proc    defaults          0       0
/dev/mmcblk0p5  /boot           vfat    defaults          0       2
/dev/mmcblk0p6 /               ext4    defaults,noatime  0       1
# a swapfile is not a swap partition, so no using swapon|off from here on, use  dphys-swapfile swap[on|off]  for that

#/dev/sda1 - the 2TB Fantom Drive
/dev/sda1       /media/1TB      ntfs-3g defaults        0       0
The first four lines were created automatically by the Raspbian install, we'll leave those alone. We're only interested in the last line that starts with /dev/sda1, that's the line I've manually added to the configuration.
BUT WHAT DOES IT ALL MEAN??? The columns of the fstab file (courtesy of the ArchLinux wiki) are
# <file system> <dir> <type> <options> <dump> <pass>
<file system> - the partition or storage device to be mounted. In my case, “/dev/sda1”
<dir> - the mountpoint where <file system> is mounted to. In my case, “/media/1TB”
<type> - the file system type of the partition or storage device to be mounted. In my case, it is “ntfs-3g”
<options> - mount options for the filesystem. In my case, I chose “defaults” which includes mounting the filesystem as read-write with no umasks for permissions/access
<dump> - not needed in our case, just use 0 (zero)
<pass> - used by fsck to decide which order filesystems are to be checked. You can set this to 0 (zero)
So my configuration file says to mount /dev/sda1 on /media/1TB as an NTFS filesystem, using default mount options, and never run fsck on this drive.
Now that you have an example, implementing is pretty easy.
-
Make a backup of your fstab file
sudo cp /etc/fstab /var/fstab -
Open fstab in your favorite text editor
sudo vim /etc/fstab - Add the lines to the configuration (see example above) to automount your drives
- Save and close the fstab file
-
Test your configuration by executing a mount all command
mount -a
If your drive correctly mounted to the mount point you specified (/media/1TB) and it is mounted as read-write, you're golden.
If you are using multiple drives, then simply add additional lines to the fstab to cover all of the drives you want to automount. Now our storage will automatically mount read-write at startup.
Part 1.3 - Samba
In my build, I wanted to share out any drives mounted in /media/ in case I added drives in the future. Additionally, accessibility rather than security was the priority for me. Because of that I set up Samba to allow anonymous access to any device on my LAN. If you're cool with that approach, follow along. If not, you may have to do some research on how to set up Samba to your liking.
-
Install samba
sudo apt-get install samba -
Open the samba config file in your favorite text editor
sudo vim /etc/samba/smb.conf -
Find the line that says “security = user” and update the file with the following lines
# "security = user" is always a good idea. This will require a Unix account # in this server for every user accessing the server. See # /usr/share/doc/samba-doc/htmldocs/Samba3-HOWTO/ServerType.html # in the samba-doc package for details. security = share guest account = nobody -
Scroll to the bottom of the Samba configuration file and add a new section for your new share. See my configuration for example
[shared] comment = Shared 1TB drive on Raspberry Pi path = /media/1TB/ browseable = yes read only = no guest ok = yes -
Test your configuration by executing
testparmand examining the outputpi@raspberrypi ~ $ testparm Load smb config files from /etc/samba/smb.conf rlimit_max: increasing rlimit_max (1024) to minimum Windows limit (16384) Processing section "[homes]" Processing section "[printers]" Processing section "[print$]" Processing section "[shared]" WARNING: The security=share option is deprecated Loaded services file OK. Server role: ROLE_STANDALONE Press enter to see a dump of your service definitions -
Assuming your test went well, reload samba
sudo /etc/init.d/samba reload -
On another device, try to mount the share. On Windows, you can just open the start menu and type “\yourservername” or “\your.server.IP.address” On a Mac, open Finder, go to the “Go” dropdown menu at the top, and choose connect to server and enter “smb://yourservername” or “smb://your.server.IP.address” If prompted for a user account, choose Guest.
OK, this is already over 1000 words long so let's take a breather and continue with XBMC in Part 2.
Part 2 - XBMC
Part 2.1 - Installing XBMC
Installing XBMC is usually pretty easy, but since we're using Raspbian we can't use the normal packages. Fortunately for me and anyone who is trying to accomplish this, Michael Gorven has already figured this out for us and even hosts the packages we need. Go ahead and open a new window or tab and browse to http://michael.gorven.za.net/raspberrypi/xbmc . The author has already done a great job of documenting this process so I won't duplicate it here. Once your installation is finished, test that you can start XBMC by executing 'sudo xbmc-standalone' and seeing if XBMC appears on your display.
This is perfect, except that XBMC is now tied to our session. Now if you're directly connected to the Pi with a keyboard, this is irrelevant. If, like me, you're doing all of your Pi work via SSH, XBMC will die once you terminate your SSH session. Let's set up XBMC as a service so we can start/stop it gracefully and allow it to run after our SSH session ends. Additionally, if you're having issues with XBMC not starting at boot, setting up a service can ensure that XBMC is started for the right run levels.
Part 2.2 - Setting up XBMC as a Service
The XBMC Wiki has a good article for how to set up XBMC as a service, but I want to expand on it a little bit.
- Create the init script file
vim /etc/init.d/xbmc - Paste the following code into your vim session:
#! /bin/sh

### BEGIN INIT INFO
# Provides:          xbmc
# Required-Start:    $all
# Required-Stop:     $all
# Default-Start:     2 3 4 5
# Default-Stop:      0 1 6
# Description:       starts instance of XBMC using start-stop-daemon and xinit
# Short-Description: starts instance of XBMC
### END INIT INFO

############### EDIT ME ##################

# path to xinit exec
DAEMON=/usr/bin/xinit

# startup args
DAEMON_OPTS=" /usr/bin/xbmc --standalone -- :0"

# script name
NAME=xbmc

# app name
DESC=XBMC

# user
RUN_AS=pi

# Path of the PID file
PID_FILE=/var/run/xbmc.pid

############### END EDIT ME ##################

test -x $DAEMON || exit 0

set -e

case "$1" in
  start)
        echo "Starting $DESC"
        start-stop-daemon --start -c $RUN_AS --background --pidfile $PID_FILE  --make-pidfile --exec $DAEMON -- $DAEMON_OPTS
        ;;
  stop)
        echo "Stopping $DESC"
        start-stop-daemon --stop --pidfile $PID_FILE
        ;;

  status)
        echo "Checking status of $DESC..."
        PID=$(cat $PID_FILE)
        # This line is for debugging purposes only
        # echo "PID is $PID"
        if ps -p $PID > /dev/null ; then
                echo "XBMC is running with PID $PID"
        else
                echo "XBMC doesn't seem to be running"
        fi
        ;;

  restart|force-reload)
        echo "Restarting $DESC"
        start-stop-daemon --stop --pidfile $PID_FILE
        sleep 5
        start-stop-daemon --start -c $RUN_AS --background --pidfile $PID_FILE  --make-pidfile --exec $DAEMON -- $DAEMON_OPTS
        ;;
  *)
        N=/etc/init.d/$NAME
        echo "Usage: $N {start|stop|restart|force-reload}" >&2
        exit 1
        ;;
esac

exit 0
Save and quit out of vim. There are a few differences between my init script and the one provided on the XBMC wiki. For one, my “runas” user is set to “pi” - you’ll want to set this to whatever user you installed XBMC with to avoid permissions issues. Additionally, my init script will take “status” as an argument to the init script and will return information about whether or not XBMC is running.
- Change the script’s permissions to make it executable
chmod a+x /etc/init.d/xbmc - Test that the init script is working:
pi@raspberrypi ~ $ sudo /etc/init.d/xbmc start Starting XBMC pi@raspberrypi ~ $ /etc/init.d/xbmc status Checking status of XBMC... XBMC is running with PID 10986 pi@raspberrypi ~ $ /etc/init.d/xbmc stop Stopping XBMC pi@raspberrypi ~ $ /etc/init.d/xbmc status Checking status of XBMC... XBMC doesn't seem to be running - If you want XBMC to start when the OS boots, update the rc.d scripts. Unless you have a specific use case, using the “defaults” argument will work for you.
sudo update-rc.d xbmc defaults - If you want to be thorough, restart your Raspberry Pi and verify that your disk has been mounted (via fstab from Part 1) and that XBMC has started.
- You’re done. Time to enjoy.

Part 2.3 - XBMC Remote
If you're going to manage your XBMC/NAS/Pi remotely, I would also suggest downloading the XBMC Remote App for your Adroid or iPhone. To enable remote control on XBMC, go to System -> Settings -> Services -> Remote Control and enable both "Allow programs on this system to control XBMC" and "Allow programs on other systems to control XBMC."
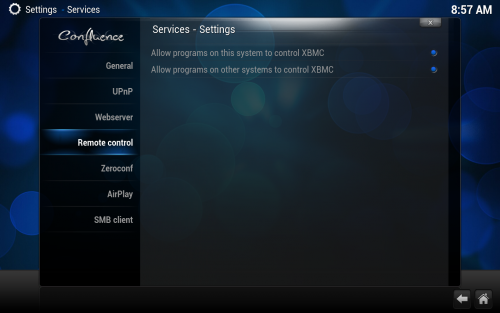
Assuming you're on the same wireless network, you should be able to connect to the XBMC with your remote app using your Pi's IP address and the default username and password of 'xbmc.'
Well at nearly 2000 words, this has been a whopper of a post. Hopefully this write up has helped you one way or another, and let me know if you have any questions. Enjoy your new combination NAS and HTPC.
Leave a Comment