
Share Your Salary App Part 3
So in Part 1 we built the core classes for our app and we exposed those classes as a RESTful web service in Part 2. Now, we'll build a UI and wrap up the project.
Feel free to check out the application first or pull up the source in another window.
The Fat Free Framework configuration allows you to specify a document root for the front-end pages. By default, this is set to the 'ui' directory in the root of the F3 directory structure. This will be our working directory for building the UI. The F3 package will have a few pages, CSS, and images in the 'ui' directory, you can delete them all if you want (I kept the welcome.htm file just out of convenience).
Now I'm not a good UI developer, so I tend to use the Bootstrap framework (v2.3.2) for the front-end of my applications. Go ahead and download the Bootstrap package and unzip it in the 'ui' directory. The 'ui' directory structure should look like this:
- ui/
- js/
- bootstrap.js
- bootstrap.min.js
- jquery.js
- css/
- base.css
- bootstrap-responsive.css
- bootstrap-responsive.min.css
- bootstrap.css
- bootstrap.min.css
- theme.css
- img/
- glyphicons-halflings-white.png
- glyphicons-halflings.png
- welcome.htm (from the f3 package)
- js/
Now we have the components that we need to start building pages. Let's start by building a layout.htm file - this will be the base HTML file (with a common header, footer, styles and script tags) that will be populated with content for each page. These types of pages/files are referred to as templates.
Again... I'm a terrible UI developer so I blatantly 'borrowed' the majority of this page from one of the Bootstrap examples.
<html lang="en">
<head>
<meta charset="utf-8">
<title>ShareYourSalary.Info</title>
<meta name="viewport" content="width=device-width, initial-scale=1.0">
<meta name="description" content="">
<meta name="author" content="">
<script src="/ui/js/jquery.js"></script>
<script src="/ui/js/bootstrap.js"></script>
<script type="text/javascript">
$(document).ready(function(){
$('[data-toggle="popover"]').popover({
placement : 'top'
});
});
</script>
<!-- Le styles -->
<link href="/ui/css/bootstrap.css" rel="stylesheet">
<style type="text/css">
body {
padding-top: 20px;
padding-bottom: 60px;
}
/* Custom container */
.container {
margin: 0 auto;
max-width: 1000px;
}
.container > hr {
margin: 60px 0;
}
/* Main marketing message and sign up button */
.jumbotron {
margin: 80px 0;
text-align: center;
}
.jumbotron h1 {
font-size: 100px;
line-height: 1;
}
.jumbotron .lead {
font-size: 24px;
line-height: 1.25;
}
.jumbotron .btn {
font-size: 21px;
padding: 14px 24px;
}
/* Supporting marketing content */
.marketing {
margin: 60px 0;
}
.marketing p + h4 {
margin-top: 28px;
}
/* Customize the navbar links to be fill the entire space of the .navbar */
.navbar .navbar-inner {
padding: 0;
}
.navbar .nav {
margin: 0;
display: table;
width: 100%;
}
.navbar .nav li {
display: table-cell;
width: 1%;
float: none;
}
.navbar .nav li a {
font-weight: bold;
text-align: center;
border-left: 1px solid rgba(255,255,255,.75);
border-right: 1px solid rgba(0,0,0,.1);
}
.navbar .nav li:first-child a {
border-left: 0;
border-radius: 3px 0 0 3px;
}
.navbar .nav li:last-child a {
border-right: 0;
border-radius: 0 3px 3px 0;
}
</style>
<link href="/ui/css/bootstrap-responsive.css" rel="stylesheet">
<!-- HTML5 shim, for IE6-8 support of HTML5 elements -->
<!--[if lt IE 9]>
<script src="ui/js/html5shiv.js"></script>
<![endif]-->
<!-- Fav and touch icons -->
<link rel="apple-touch-icon-precomposed" sizes="144x144" href="/ui/ico/apple-touch-icon-144-precomposed.png">
<link rel="apple-touch-icon-precomposed" sizes="114x114" href="/ui/ico/apple-touch-icon-114-precomposed.png">
<link rel="apple-touch-icon-precomposed" sizes="72x72" href="/ui/ico/apple-touch-icon-72-precomposed.png">
<link rel="apple-touch-icon-precomposed" href="/ui/ico/apple-touch-icon-57-precomposed.png">
<link rel="shortcut icon" href="/ui/ico/favicon.png">
</head>
<body>
<div class="container">
<div class="masthead">
<h1 class="muted">ShareYourSalary</h1>
<div class="navbar">
<div class="navbar-inner">
<div class="container">
<ul class="nav">
<li class="active"><a href="/">Home</a></li>
<li><a href="/swagger/dist/index.html">API Documentation</a></li>
<li><a href="https://github.com/alexdglover/shareyoursalary">Github Project</a></li>
</ul>
</div>
</div>
</div><!-- /.navbar -->
</div>
<!-- Put content here -->
<?php echo $this->render(Base::instance()->get('content')); ?>
<hr>
<div class="footer">
<p>© alexdglover 2014</p>
</div>
</div> <!-- /container -->
<!-- Le javascript
================================================== -->
<!-- Placed at the end of the document so the pages load faster -->
<script src="/ui/js/jquery.js"></script>
<script src="/ui/js/bootstrap.js"></script>
</body>
</html>
Now the important piece we've added here is between the 'masthead' and 'footer' divs:
<!-- Put content here -->
<?php echo $this->render(Base::instance()->get('content')); ?>
Now we can just set the 'content' variable in our F3 code to populate the body of the template and we will get consistent and clean looking pages. That's the whole purpose of templates and template engines - build a solid base page (or pages) and just populate the contents dynamically. This makes for great code re-use and you don't have to propagate changes across dozens of files.
Static Pages
For populating the content with a static page, we don't really need a Controller class, we just need F3's routing functionality to set the 'content' variable to a static HTML file. The ShareYourSalary app home page is going to be static, so let's use that as an example.
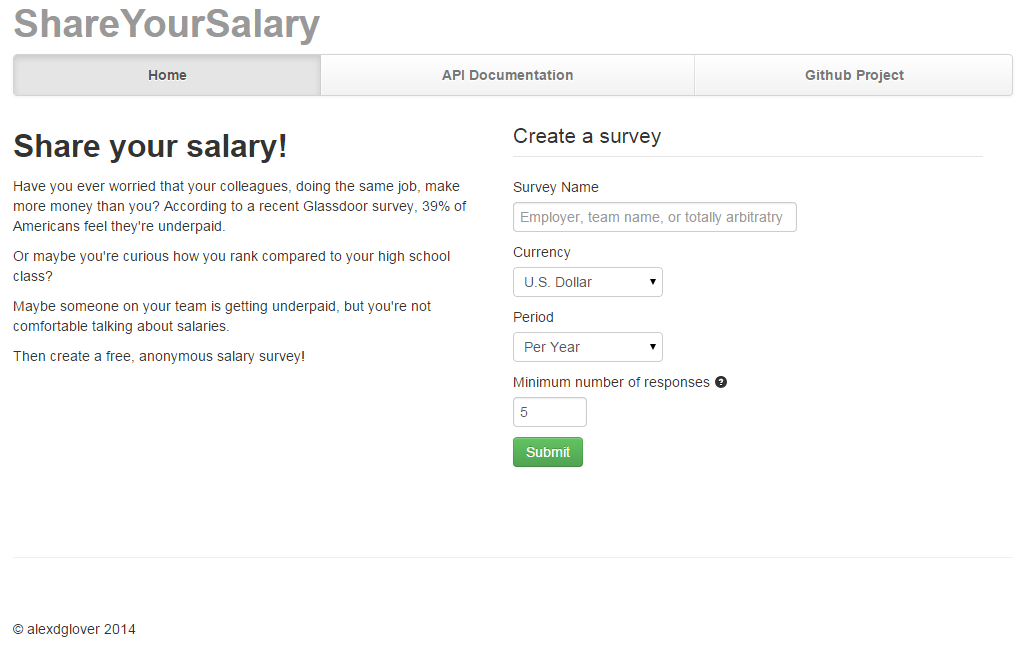
For the home page, we'll want a simple explanation of what the site/app does and an entry form for users to create a new survey. Our entry form will POST values to the API using jQuery and route us to a result page if it's successful. Remember, we don't have to worry about JavaScript or CSS references because our layout.htm already includes all of that. Let's take a look at the home page (welcome.htm):
<div class="row">
  <div class="span5">
    <h2>Share your salary!</h2>
    <p>Have you ever worried that your colleagues, doing the same job, make more money than you? According to a recent Glassdoor survey, 39% of Americans feel they're underpaid.</p>
    <p>Or maybe you're curious how you rank compared to your high school class?</p>
    <p>Maybe someone on your team is getting underpaid, but you're not comfortable talking about salaries.</p>
    <p>Then create a free, anonymous salary survey!</p>
  </div>
  <div class="span5">
    <form>
      <fieldset>
        <legend>Create a survey</legend>
        <label>Survey Name</label>
        <input class="input-xlarge" name="surveyName" type="text" placeholder="Employer, team name, or totally arbitratry" />
        <label>Currency</label>
        <select class="input-medium" name="currency">
          <option value="" disabled="">Select Currency</option>
          <option value="AUD">Australian Dollar</option>
          <option value="BRL">Brazilian Real </option>
          <option value="CAD">Canadian Dollar</option>
          <option value="CZK">Czech Koruna</option>
          <option value="DKK">Danish Krone</option>
          <option value="EUR">Euro</option>
          <option value="HKD">Hong Kong Dollar</option>
          <option value="HUF">Hungarian Forint </option>
          <option value="ILS">Israeli New Sheqel</option>
          <option value="JPY">Japanese Yen</option>
          <option value="MYR">Malaysian Ringgit</option>
          <option value="MXN">Mexican Peso</option>
          <option value="NOK">Norwegian Krone</option>
          <option value="NZD">New Zealand Dollar</option>
          <option value="PHP">Philippine Peso</option>
          <option value="PLN">Polish Zloty</option>
          <option value="GBP">Pound Sterling</option>
          <option value="SGD">Singapore Dollar</option>
          <option value="SEK">Swedish Krona</option>
          <option value="CHF">Swiss Franc</option>
          <option value="TWD">Taiwan New Dollar</option>
          <option value="THB">Thai Baht</option>
          <option value="TRY">Turkish Lira</option>
          <option value="USD" selected="YES">U.S. Dollar</option>
        </select>
        <label>Period</label>
          <select class="input-medium" name="period">
            <option value="Per Year">Per Year</option>
            <option value="Per Hour">Per Hour</option>
          </select>
        <label>Minimum number of responses <i class="icon-question-sign" data-toggle="popover" data-placement="top" title="Miniumum number of responses" data-content="In order to ensure anonymity, salary survey results won't be published until a minimum number of salary responses are submitted. Set this to '0' if you don't care about anonymity."></i></label>
        <input class="input-mini" name="minEntries" type="number" value=5 />
        <p><input id="submit" type="submit" class="btn btn-success" value="Submit" /></p>
      </fieldset>
    </form>
  </div>
</div>
<script>
  $( "form" ).on( "submit", function( event ) {
    event.preventDefault();
    var datastring = $( "form" ).serialize();
    $.ajax({
      type: "POST",
      url: "/api/v1/survey/AddSurvey",
      data: datastring,
      dataType: "json",
      success: function(data) {
        window.location.href = "/thanks/" + data.URLName;
      },
      error: function(){
        alert('Oops... something went wrong. Please try again.');
      }
    });
  });
</script>
Perfect. The default index.php that's included in the F3 package will include a route for "GET /" that we can use. This section should already exist in the index.php if you're using the default file that came with the F3 zip file, but just confirm that these lines exist in your index.php:
$f3->route('GET /',
  function($f3) {
    ...
    // lots of default F3 code
    ...
    $f3->set('content','welcome.htm');
    echo View::instance()->render('layout.htm');
  }
);
If you want to use a different file name for your home page (instead of welcome.htm) just change it in this line of the index.php file. Now if we browse to our site, we should see our home page:
Now we can partially test this form if we want. If we submit a survey and the API processes it successfully, we'll get routed to a page that doesn't exist yet (that's OK, that's expected behavior). But how do we know the submission worked? We can go back to our API test page we created in Part 2 and execute a getByName API call.
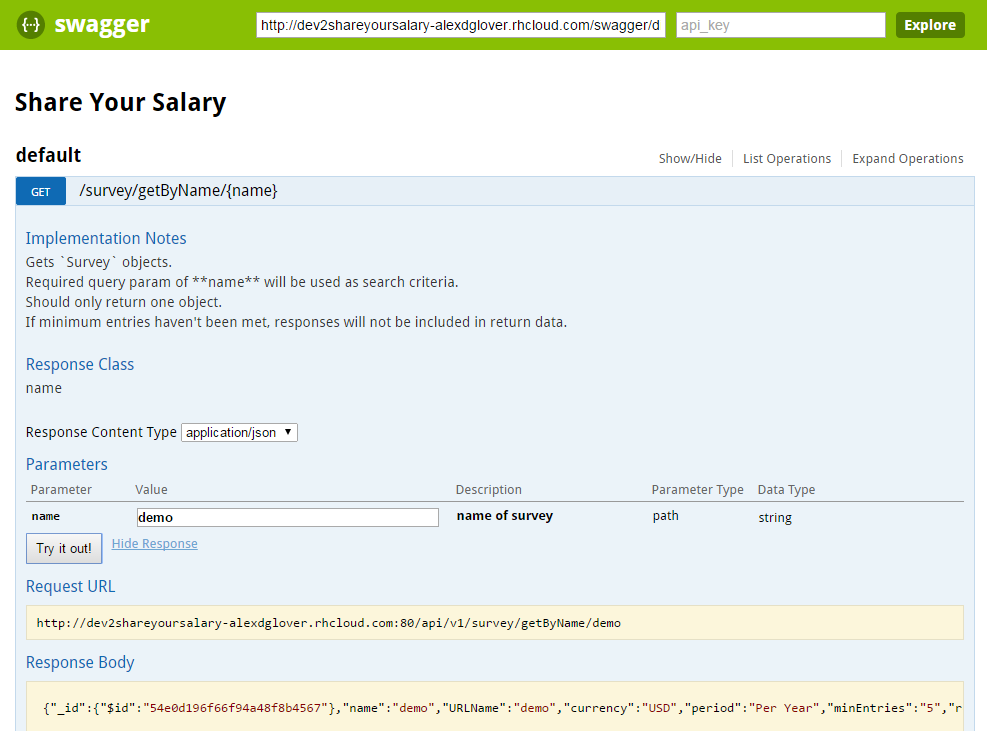
If we tried to create a survey called 'demo' then all we need to do is execute the /survey/getByName/{name} API with that value. You can do this in Swagger, or since it's just a GET request, you can do it directly in your browser. Just browse to /api/v1/survey/getByName/demo and you should see the JSON response.
OK, at this point we should have a static home page and a working form. Next, we'll have to create dynamic pages for each survey that's created.
Dynamic Pages
For populating dynamic content, you can write your logic directly in F3's index.php, abstract it into individual classes, or you can do what I did and consolidate it all into one PageGenerator class. This will simplify our F3 routes (more on this later) and manage all of our dynamic views in one place.
For this project, we need 3 pages or Views (excluding the static home page):
- A page users hit after creating a survey. We'll call this 'thanks' as we'll be thanking users for creating a survey and enable them to invite others to participate
- A page for users who've been invited to participate in an existing survey. We'll call this 'addResponse' because ultimately that's the only purpose for this page
- A page for users (both invitees and the original survey creator) to review the results of the survey. We'll call this 'report'
First, let's construct our controller that will get all of the relevant variables for these pages and then set the content. Let's review the code:
<?php
class PageGenerator {
  // Instantiate variables
  var $surveyName;
  var $currency;
  var $period;
  var $minentries;
  private $db;

  // Construct the PageGenerator object with a Database object
  public function __construct(){
    $this->db = new Database();
  }

  // Utility function to convert survey names to a URL-friendly name
  private function convertNameToURLName($string) {
    //Lower case everything
    $string = strtolower($string);
    //Make alphanumeric (removes all other characters)
    $string = preg_replace("/[^a-z0-9_\s-]/", "", $string);
    //Clean up multiple dashes or whitespaces
    $string = preg_replace("/[\s-]+/", " ", $string);
    //Convert whitespaces and underscore to dash
    $string = preg_replace("/[\s_]/", "-", $string);
    return $string;
  }


  // Function for populating the 'thanks' page (after a user creates a survey). This collects all of the relevant survey information into the 'survey' JSON object and sets the 'content' variable to the code in the thanks.htm file

  public function thanks($f3,$args){
    $surveys = $this->db->get_collection('surveys');
    // Convert name to URL friendly name
    $URLName = $this->convertNameToURLName($args['name']);
    $query = array('URLName' => $URLName);
    $cursor = $surveys->find($query);
    foreach ($cursor as $doc){
      $f3->set('survey',$doc);
    }
    $f3->set('content','thanks.htm');
    echo View::instance()->render('layout.htm');
  }


  // Function for populating the 'addResponse' page (the page invited users see). This collects all of the relevant survey information into the 'survey' JSON object and sets the 'content' variable to the code in the addResponse.htm file

  public function addResponse($f3,$args){
    $surveys = $this->db->get_collection('surveys');
    // Convert name to URL friendly name
    $URLName = $this->convertNameToURLName($args['name']);
    $query = array('URLName' => $URLName);
    $cursor = $surveys->find($query);
    foreach ($cursor as $doc){
      $f3->set('survey',$doc);
    }
    $f3->set('content','addResponse.htm');
    echo View::instance()->render('layout.htm');
  }


  // Function for populating the 'report' page. This collects all of the relevant survey information into the 'survey' JSON object and sets the 'content' variable to the code in the report.htm file

  public function report($f3,$args){
    $surveys = $this->db->get_collection('surveys');
    // Convert name to URL friendly name
    $URLName = $this->convertNameToURLName($args['name']);
    $query = array('URLName' => $URLName);
    $cursor = $surveys->find($query);
    foreach ($cursor as $doc)
    {
      if (count($doc['responses']) < $doc['minEntries'])
      {
        $f3->set('minEntriesMet', false);
      }
      else
      {
        asort($doc['responses']);
        $f3->set('minEntriesMet', true);
        $averageSalary = round((array_sum($doc['responses']))/(count($doc['responses'])),2);
        $f3->set('averageSalary',$averageSalary);
        $percentDeltas = [];
        foreach($doc['responses'] as $response)
        {
          array_push($percentDeltas, (round((($response-$averageSalary)/$averageSalary),2) ) );
        }
        asort($percentDeltas);
        $f3->set('percentDeltas',$percentDeltas);
        // Median code borrowed from http://www.mdj.us/web-development/php-programming/calculating-the-median-average-values-of-an-array-with-php/
        sort($doc['responses']);
        $count = count($doc['responses']); //total numbers in array
        $middleval = floor(($count-1)/2); // find the middle value, or the lowest middle value
        if($count % 2) { // odd number, middle is the median
          $median = $doc['responses'][$middleval];
        } else { // even number, calculate avg of 2 medians
          $low = $doc['responses'][$middleval];
          $high = $doc['responses'][$middleval+1];
          $median = (($low+$high)/2);
        }
        $f3->set('median',$median);
      } //End of minEntriesMet==true block
      $f3->set('survey',$doc);
    }
    $f3->set('content','report.htm');
    echo View::instance()->render('layout.htm');
  }
}
?>
As you can see, the functions follow a very similar pattern - we get a survey name input (via F3's $args variable), grab the relevant survey data from the DB, set one (or more) JSON objects to be consumed in the page, and set the 'content' variable to the appropriate page. From inside of the View, we'll grab the individual elements out of the array and use it in the display or JavaScript.
Now for the Views. Let's walk through the app as a user would, just for intuitiveness. Our user has created a survey successfully, so let's thank them for creating it and show them the details of the survey so they can confirm everything is right. Let's also add a mechanism for the user to invite their friends and colleagues through social media. Our survey creator might also be participating, so let's enable them to add a response right away as well. Finally, we need to provide a link to the survey report where users can view the results. Remember, our PageGenerator controller is going to pass us all of the data we need in one array object titled $survey. Let's take a look at the HTML:
<h2>Thanks for creating a survey!</h1>
<div class="row">
<div class="span5">
<legend>Survey Details</legend>
<p><strong>Survey name</strong><br /><?php echo $survey['name']; ?></p>
<p><strong>Salary currency</strong><br /><?php echo $survey['currency']; ?></p>
<p><strong>Salary period</strong><br /><?php echo $survey['period']; ?></p>
<p><strong>Minimum number of responses before results published</strong><br /><?php echo $survey['minEntries']; ?></p>
<p><strong>Current number of responses</strong><br /><?php echo count($survey['responses']); ?></p>
</div>
<div class="span5">
<legend>Next Steps</legend>
<ol>
<li>Invite others to participate by sharing<br />
<a target="_blank" href="<?php echo "http://www.facebook.com/sharer/sharer.php?u=" . "http://$_SERVER[HTTP_HOST]" . "/addResponse/" . $survey['URLName']; ?>"><img src="/ui/img/facebook_001.jpg" style="width:32px; height:32px;" /></a>
<a target="_blank" href="<?php echo "https://twitter.com/intent/tweet?text=How%20much%20do%20you%20make%3F&url=" . "http://$_SERVER[HTTP_HOST]" . "/addResponse/" . $survey['URLName']; ?>"><img src="/ui/img/Twitter_001.jpg" style="width:32px; height:32px;" /></a>
<a target="_blank" href="<?php echo "http://www.linkedin.com/shareArticle?mini=true&url=" . "http://$_SERVER[HTTP_HOST]" . "/addResponse/" . $survey['URLName'] . "&title=Salary%20Survey"; ?>"><img src="/ui/img/Linkedin_001.jpg" style="width:32px; height:32px;" /></a>
<a href="<?php echo "http://pinterest.com/pin/create/button/?url=" . "http://$_SERVER[HTTP_HOST]" . "/addResponse/" . $survey['URLName']; ?>" class="pin-it-button" count-layout="horizontal"><img src="/ui/img/Pinterest_001.jpg" style="width:32px; height:32px;" /></a>
<br />
Or by sending them this link:<br /><a href="<?php echo "http://$_SERVER[HTTP_HOST]" . "/addResponse/" . $survey['URLName']; ?>"><?php echo "http://$_SERVER[HTTP_HOST]" . "/addResponse/" . $survey['URLName']; ?></a></li>
<li>Enter your salary<br />
<form>
<div class="input-append">
<input name="response" type="text" pattern="[1-9]{1}[0-9]*\.?[0-9]{0,2}" placeholder="Enter your salary" />
<span class="add-on"><?php echo $survey['currency'] ?> <?php echo $survey['period'] ?></span>
</div>
<input id="submit" type="submit" class="btn btn-success" value="Submit" />
</form>
</li>
<li>
Once the minimum number of entries are met, see the salary analysis report here: <a href="<?php echo "http://$_SERVER[HTTP_HOST]" . "/report/" . $survey['URLName']; ?>"><?php echo "http://$_SERVER[HTTP_HOST]" . "/report/" . $survey['URLName']; ?></a>
</li>
</ol>
</div>
</div>
<script>
$( "form" ).on( "submit", function( event ) {
event.preventDefault();
var datastring = $( "form" ).serialize();
$.ajax({
type: "POST",
url: "/api/v1/survey/addResponse/<?php echo $survey['URLName'] ?>",
data: datastring,
dataType: "json",
success: function(data) {
alert("Thanks! You've successfully entered your salary information.");
},
error: function(){
alert('Oops... something wrong');
}
});
});
</script>
One point of interest - you may have noticed the "pattern" property set on the one ofthe HTML inputs. This is a regular expression that tells the input field what valuesare allowed. Let's examine this pattern by breaking it up:
pattern="[1-9]{1}[0-9]*\.?[0-9]{0,2}"
[1-9]{1} - this means we want one and only one character, and it has to be a digit 1-9. This prevents users from submitting a value that starts with a leading zero.
[0-9]* - this means any character 0-9, an unlimited number of times.
\.? - this means we're expecting zero or one period. This allows our users to enter a decimal point if they want, but at most one.
[0-9]{0,2} - this means we'll accept zero, one, or two of any characters between 0 and 9.
What this all boils down to is a user can enter any number with no decimal places, a single decimal place, or two decimal places, and nothing else. No symbols, letters, or illegitimate formats. This ensures we have clean valid numbers to do mathematical operations on later for the 'report' page.
The 'addResponse' page is simpler and re-uses a lot of the same code as the 'thanks' page, so let's jut jump right into it.
<h2>You've been invited!</h1>
<div class="row">
<div class="span5">
<legend>Wait, what's going on?</legend>
<p>You've been invited to participate in an anonymous survey about salaries. Someone has already created the survey and invited you and others to participate. Your salary information is totally anonymous - no login or email address is required. To ensure anonymity, the results of the survey aren't published until a minimum number of responses are made (see below).</p>
<p><strong>Survey name</strong><br /><?php echo $survey['name']; ?></p>
<p><strong>Minimum number of responses before results published</strong><br /><?php echo $survey['minEntries']; ?></p>
<p><strong>Current number of responses</strong><br /><?php echo count($survey['responses']); ?>
</div>
<div class="span5">
<legend>Next Steps</legend>
<ol>
<li>Enter your salary<br />
<form>
<div class="input-append">
<input name="response" type="text" pattern="[1-9]{1}[0-9]*\.?[0-9]{0,2}" placeholder="Enter your salary" />
<span class="add-on"><?php echo $survey['currency'] ?> <?php echo $survey['period'] ?></span>
</div>
<p><input id="submit" type="submit" class="btn btn-success" value="Submit" /></p>
</form>
</li>
<li>
Once the minimum number of entries are met, see the salary analysis report here: <a href="<?php echo "http://$_SERVER[HTTP_HOST]" . "/report/" . $survey['URLName']; ?>"><?php echo "http://$_SERVER[HTTP_HOST]" . "/report/" . $survey['URLName']; ?></a>
</li>
</ol>
</div>
</div>
<script>
$( "form" ).on( "submit", function( event ) {
event.preventDefault();
var datastring = $( "form" ).serialize();
$.ajax({
type: "POST",
url: "/api/v1/survey/addResponse/<?php echo $survey['URLName'] ?>",
data: datastring,
dataType: "json",
success: function(data) {
alert("Thanks! You've successfully entered your salary information.");
},
error: function(){
alert('Oops... something wrong');
}
});
});
</script>
Easy right? OK, the last page is the 'report' page where we'll give some basic statistics from the survey results and a nice little chart. The statistics are pretty easy to calculate, and for the chart we'll use Google Charts API via JavaScript. Let's take a look.
<h2>Salary Analysis for Survey '<?php echo $survey['name']; ?>'</h1>
<div class="row">
  <?php if($minEntriesMet) { ?>
  <div class="span5">
    <legend>Survey Details</legend>
    <p><strong>Survey name</strong><br /><?php echo $survey['name']; ?></p>
    <p><strong>Average salary</strong><br /><?php echo $averageSalary ?> <?php echo $survey['currency']; ?> <?php echo $survey['period']; ?></p>
    <p><strong>Median salary</strong><br /><?php echo $median ?> <?php echo $survey['currency']; ?> <?php echo $survey['period']; ?></p>
    <!--<p><strong>Salary currency</strong><br /><?php echo $survey['currency']; ?></p>
    <p><strong>Salary period</strong><br /><?php echo $survey['period']; ?></p>-->
    <p><strong>Minimum number of responses before results published</strong><br /><?php echo $survey['minEntries']; ?></p>
    <p><strong>Current number of responses</strong><br /><?php echo count($survey['responses']); ?>
  </div>
  <div class="span5">
    <legend>Relative Salary Comparison</legend>
    <div id="chart_div" style="width: 100%; height: 300px;"></div>
  </div>
  <?php } else { ?>
  <div class="span12">
    Uh oh, minimum number of responses haven't been met yet. Minimum number of responses is <?php echo $survey['minEntries']; ?> and there have been <?php echo count($survey['responses']); ?> responses so far.<br /><br />No report data available.
  </div>
  <?php } ?>
</div>
<script type="text/javascript" src="https://www.google.com/jsapi?autoload={'modules':[{'name':'visualization','version':'1','packages':['corechart']}]}"></script>
<!--<div id="chart_div" style="width: 100%; height: 500px;"></div>-->
<script>
  google.setOnLoadCallback(drawChart);
  function drawChart() {
    var dataTable =  new google.visualization.DataTable();
    dataTable.addColumn('number', 'Salary');
    dataTable.addColumn('number', '% Delta');
    <?php for($i=0; $i < count($survey['responses']); $i++){
      echo 'dataTable.addRow(['. $survey['responses'][$i]. ',' . $percentDeltas[$i] . ']);';
    };?>

    var formatter = new google.visualization.NumberFormat({
        fractionDigits: 2,
        prefix: '$'
    });

    formatter.format(dataTable, 0); // Apply formatter to salary column.

    var formatter = new google.visualization.NumberFormat({
        fractionDigits: 2,
        pattern: '###%'
    });

    formatter.format(dataTable, 1); // Apply formatter to percent delta column.

    var options = {
      title: 'Salary comparison',
      hAxis: {title: 'Salary', minValue: 0, maxValue: 10, format: '$#'},
      vAxis: {title: 'Percent above/below average', minValue: -1, maxValue: 1, format: '#%'},
      legend: 'none'
    };

    var chart = new google.visualization.ScatterChart(document.getElementById('chart_div'));

    chart.draw(dataTable, options);
  }
</script>
OK, so theoretically our PageController and our four Views should all be working at this point, we just need to add routes to our index.php for these pages. Much like our API routes, we'll specify a URL that includes variables in the URL string itself. Let's create a route for each of our three new Views:
// Page generator - class of functions for populating pages
$f3->route('GET /thanks/@name','PageGenerator->thanks');
$f3->route('GET /report/@name','PageGenerator->report');
$f3->route('GET /addResponse/@name','PageGenerator->addResponse');
Since these are normal web pages, we'll use the default GET method. Next we specify the path including the variable prefixed with the @ sign, and finally we tell F3 which class and function to map the route to (in the format of ClassName->functionName). Now we can hit those URLs with 'demo' as the name argument and we should see the pages populated with the details of the 'demo' survey object.
That's it - we now have a full working application including an API and a very decent user interface (it's even mobile friendly, thanks to Bootstrap).
Deployment Notes and 'Cloudiness'
This is already an insanely long write-up for this project, but I want to push through to make a couple important comments.
Before your F3 app is live in production, we need to make one more small change. By default, F3 will log error output directly to the browser. This is great for debugging, but unfortunately it can spit out sensitive information, like the username and password for our MongoDB. To disable this level of error logging, simply modify the 'DEBUG' F3 variable to 0, like this:
$f3->set('DEBUG',0);
Simple.
Deployment with OpenShift is trivial, as you're really doing continuous delivery - every time you push your code, OpenShift redeploys your environment with the new code. If you haven't been doing this along the way, you just need 3 commands to deploy your code:
# Execute this from within your OpenShift project directory
git add -A # add all changes to the git index
git commit -m 'add your commit message'
git push
Done. You can now hit the app by browsing to your OpenShift-generated DNS name. Adding your own custom DNS name is easy, and I'll cover that in a separate post.
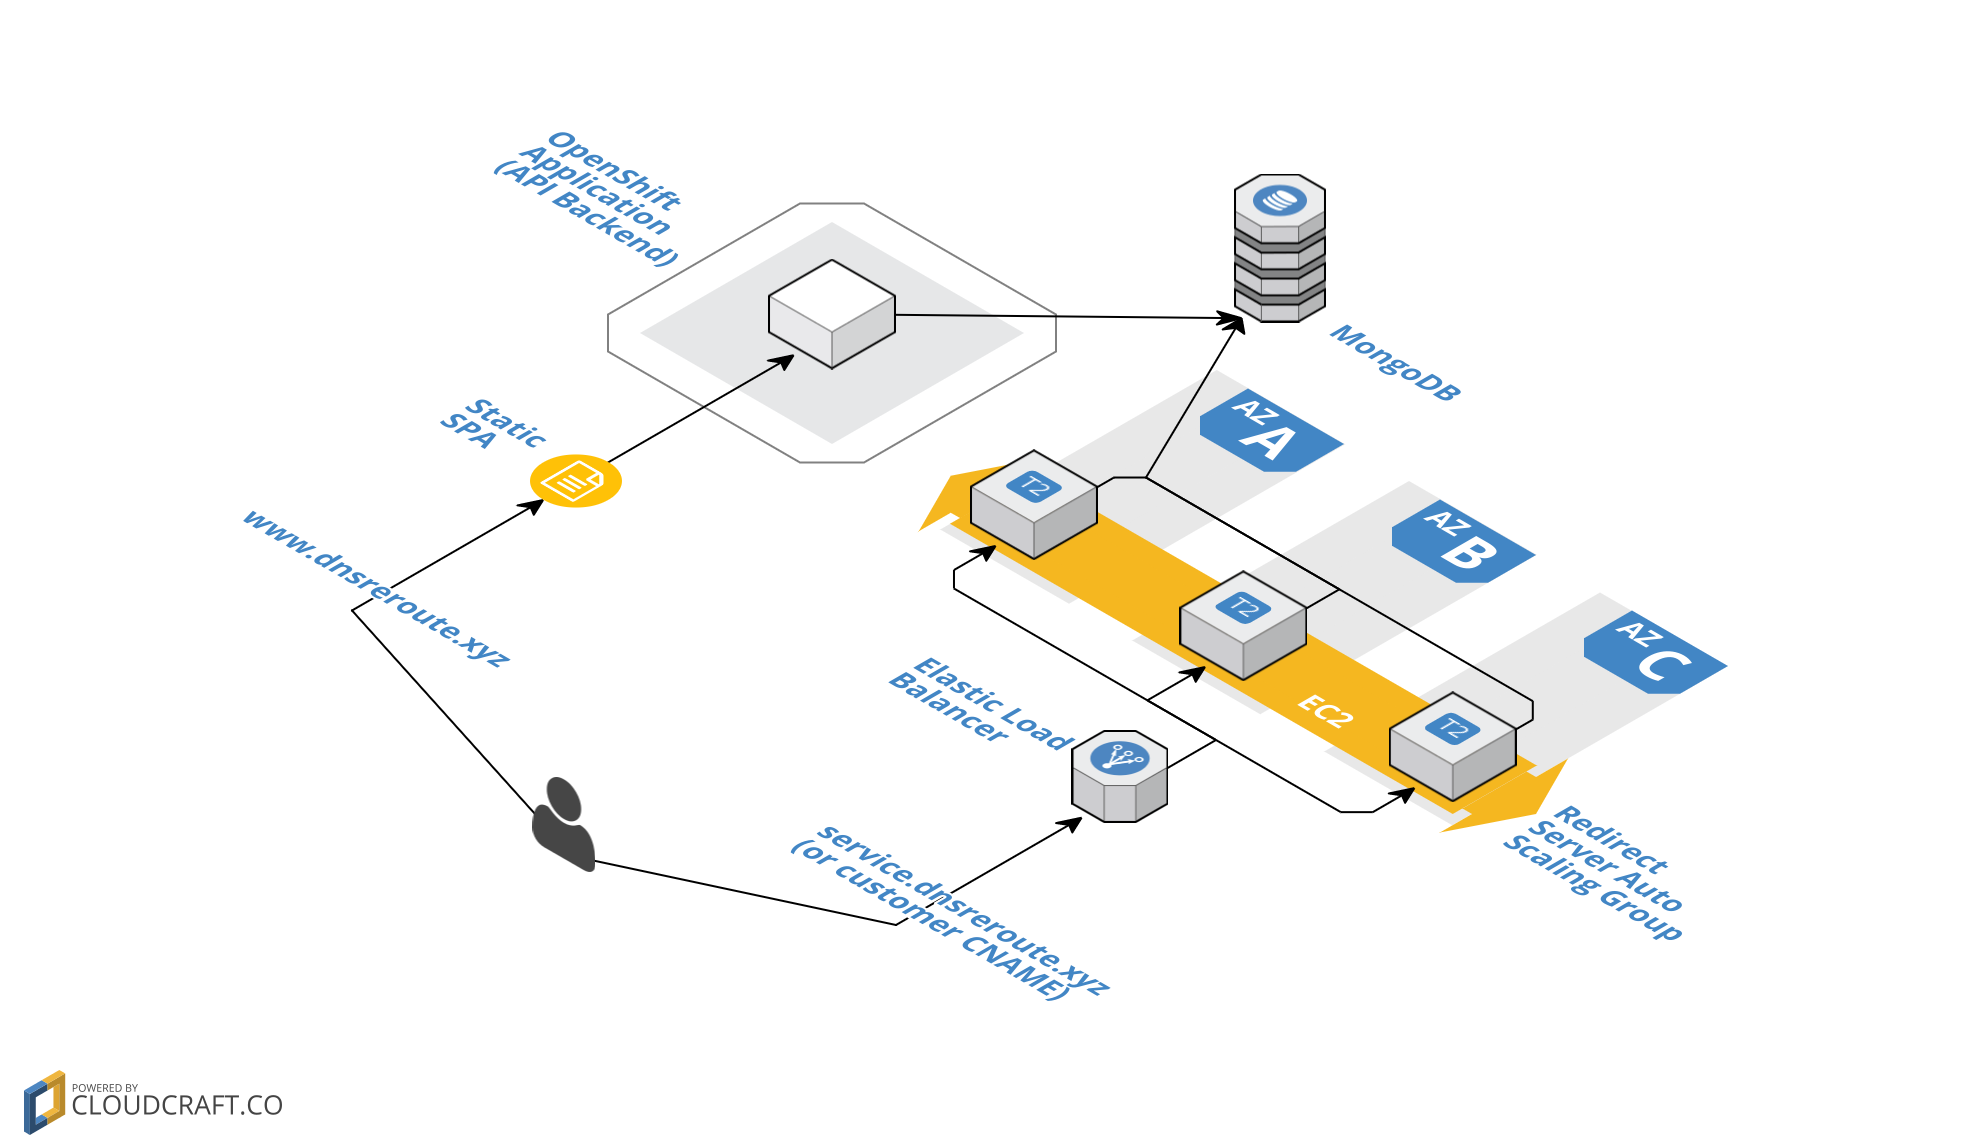
As for cloudiness - the application might not be that complex and my object-oriented skills are garbage, but from an infrastructure/hosting perspective, it's the Holy Grail. Here's why:
- The app doesn't care about DNS names. You can hit the app at http://shareyoursalary.alexdglover.com or http://shareyoursalary-alexdglover.rhcloud.com, or even http://www.shareyoursalary.gq/ and the app works perfectly. You can deploy it anywhere, change DNS names whenever, you can give customers/users their own custom 'vanity' URLs, and the app will give consistent results. It's extremely flexible and portable.
- There are no sessions to worry about, making load-balancing extremely easy.
- Since all of the app functionality is API based, we can scale the application horizontally just by adding more PHP instances behind the load balancer.
- By using a NoSQL database (MongoDB), the database layer can also be scaled horizontally.
- All of the code is deployment agnostic - since we're using environment variables for the database connection details, this same source can be deployed to development, QA, and production environments without any changes.
- There are no high-cost or proprietary application components. You can run this app in any cloud hosting environment, on a number of operating systems, using off-the-shelf images/services in many cases.
- The deployment is as easy as putting the contents of our project directory in the document root of the Apache/PHP servers. There's no configuration necessary.There is no DB schema to set up as part of the app deployment - the application will create the collection (read: table) on the fly and start inserting records.
In short, it should be very easy for anybody with minimal cloud automation training to deploy this application in a highly available and scalable model. Specifically, the app can handle instance failures in any tier and can scale horizontally to support hundreds of thousands of concurrent users without human intervention or configuration. With all of the advancements in cloud and automation, this should be the de facto standard for all but the largest and most complex apps.
As always, I hope this post has been helpful and let me know if you have any questions.
Leave a Comment